Project Cojones Updated

Re: It's Geetee; and I have a GTU and a 3400 engine
Got a little issue here. I ordered an oil pressure sending unit for the 89, but the threads on the one for the 3400 block are larger, and the sensor is also a 1 pin vs. the 89's 3 pin. Do you know what was done on Roberts car for this Jon? I've read around a little bit but haven't found much anything conclusive. Saw some suggestions to get a sensor for a 95 L Body (I guess it has the right threads for the 3400 block and the right 3 pin connection for the 89?) and to also get some kind of thread apator (but would this effect reading/sensor?).
Got the engine back together (timing cover, oil pan, etc). Mated it to the trans finally. Still waiting on that damn tap kit... I fucked up and ordered the wrong thing, ordered a set of 6 1/2" helicoils instead of the tap kit... I was so pissed when I opened that package on Tuesday... Oh well should be here in a few days then the engine will be pretty much done.
Got the engine back together (timing cover, oil pan, etc). Mated it to the trans finally. Still waiting on that damn tap kit... I fucked up and ordered the wrong thing, ordered a set of 6 1/2" helicoils instead of the tap kit... I was so pissed when I opened that package on Tuesday... Oh well should be here in a few days then the engine will be pretty much done.
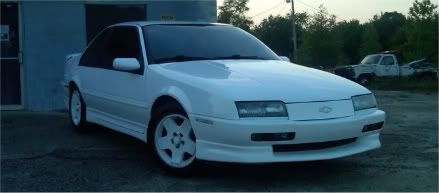
90 Beretta GTZ
93 Beretta GT
89 Beretta GTU
95 Beretta Z26
95 Aurora
07 Colorado Xtreme
-
3X00-Modified

- Administrator
- Posts: 10912
- Joined: Thu Jul 05, 2007 9:18 am
- Location: Brooklyn CT
Re: It's Geetee; and I have a GTU and a 3400 engine
I do not know what was done for Roberts car exctly oil pressure sender wise... but this is what I think was done, I know is he has two different sensors on the engine... One was wired into his 2000 ECU and the other was going to his dash, (smaller thread version it simply had a pipe adapter to thread to the 3400) All I did was get him a 95 long analog style sensor so the threads were bigger and used that for the replacement to elimnate that threaded adapter. The sensor that went to the ECU was one of the short ones and IIRC the long sensor that I replaced only had 1 pin going from it to the dash, there might have been two or three wires at one time for the fuel pump cut off but I think thats what the second sender is for, it had two wires at it IIRC.
As I said in the past I did not do the original 3400 swap or the OBDII swap in Roberts car so I know of some of the details of how that was done but not all of them.
Let me know if you want to offload those TOG headers too... I'm interested in them.
As I said in the past I did not do the original 3400 swap or the OBDII swap in Roberts car so I know of some of the details of how that was done but not all of them.
Let me know if you want to offload those TOG headers too... I'm interested in them.
Re: It's Geetee; and I have a GTU and a 3400 engine
Thanks Jon, I contacted Rock Auto about a 95 sensor and they confirmed that it would be the right thread and that it's also a 3 pin sensor, that should be the fix.
Didn't really catch or notice this detail if it was on any of the 3400 walk throughs. All the more reason to write my own up I guess...
Got the right fuel line ends finally, was pretty simple. Just used a pipe cutter, gonna file the edges down and clean them up first.
Ordered a new set of injectors from WOT-Tech just cause I don't trust the ones I have.
Picked up a red front bumper off of that 93 I saw at the yard. Mine was pretty much toast. I'd really like to mold in the Z04 turn/fog splitters some kind of way... I've seen where a few people have done that and it looks really good.
Considering buying a Flexalite dual fan like the one I have in my GTZ, worked real well not to mention a lot more compact.
Not much left that I need to buy, just have to assemble. My tap kit came in, I can now get to fixing the head and getting the rest of the motor together. Hopefully be getting it really going in a few weeks.
90 Beretta GTZ
93 Beretta GT
89 Beretta GTU
95 Beretta Z26
95 Aurora
07 Colorado Xtreme
Re: It's Geetee; and I have a GTU and a 3400 engine
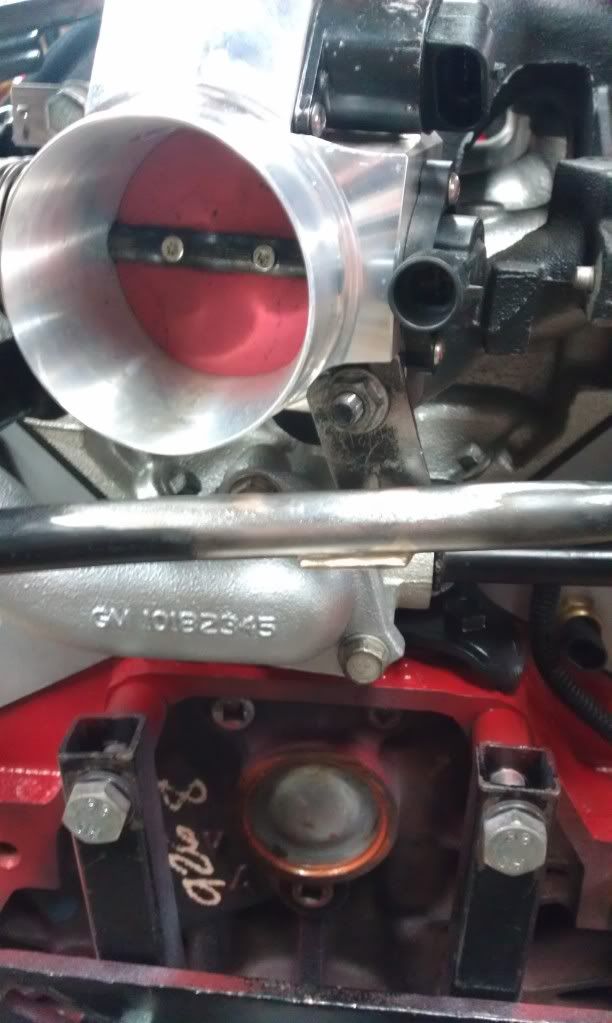
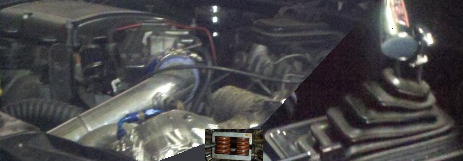
Lol, so here's one, you all will like this. As you may know you have to grind the 3500 UIM to make it fit with the 3100/3400 fuel rail setup... Well, I grinded so much off that I now have a hole in my intake. Lol, I'm more amused with my stupidity than I am angry... I grinded off as much as you could possibly take off to make it fit, and that's where I ended up. (Not sure if I can have someone weld the hole shut or what?)
To make it fit I just grinded rib of the FPR on that side where it it's the UIM, and the side of the bracket that holds the FPR on... Not sure if you're supposed to grind the FPR at all, I may have messed that up as well, but I do know that the intake now fits! Just have to fix this goddamn hole in it...
Anyhow, here it is FWIW.
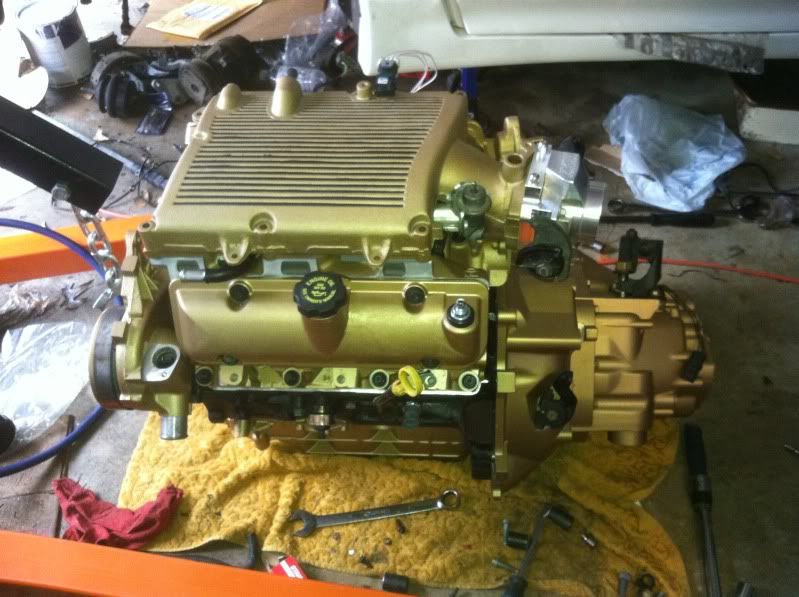
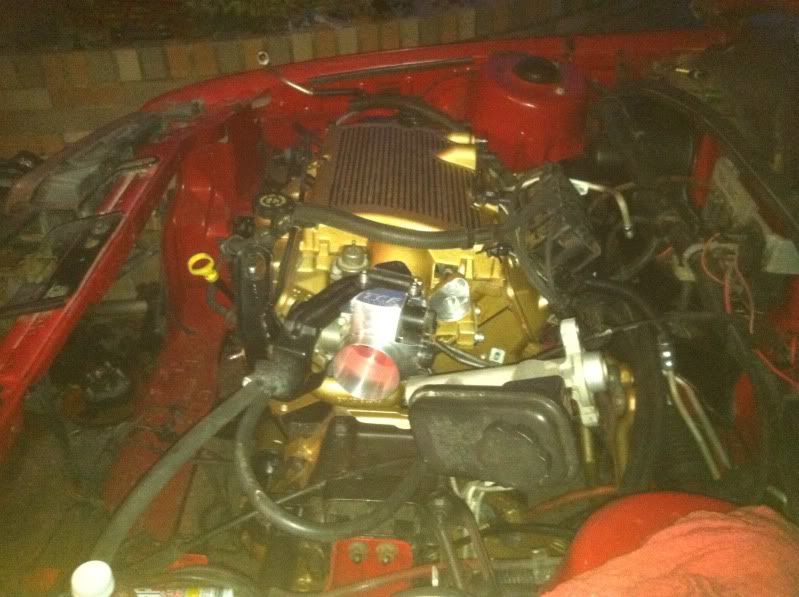
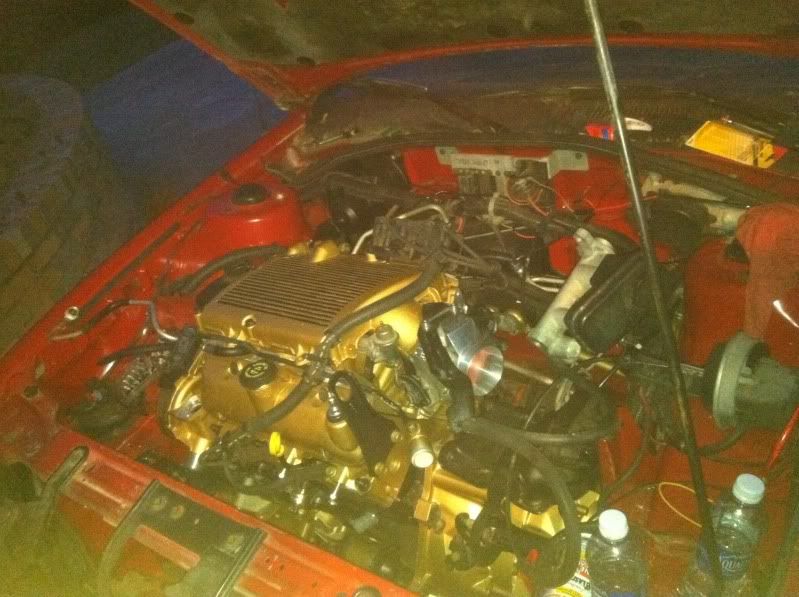
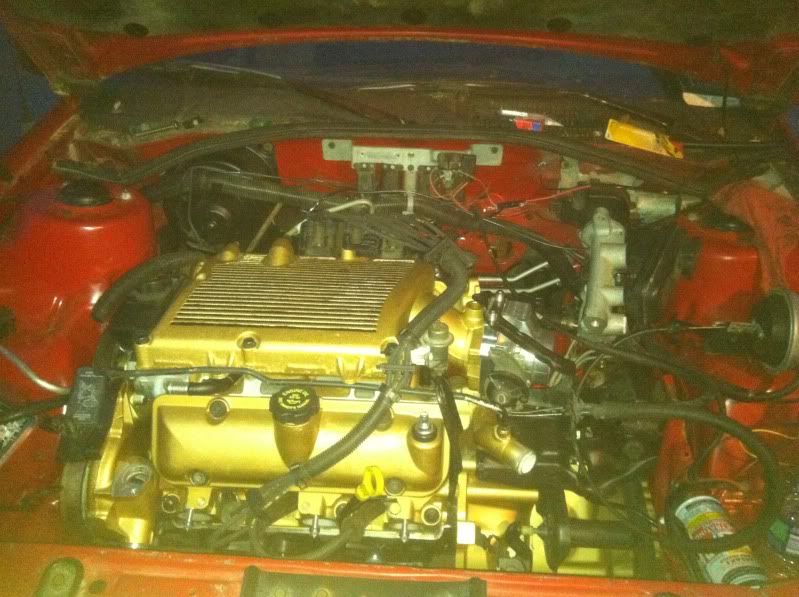
Da Mota. All together finally, roller rocker finally helicoiled. Engine bay is mostly finished up. Have to master the fuel lines... not sure if I'm doing them right, no matter how much I tighten the compression fittings they seem to be able to fidget loose... Beyond that just have to run a amp power wire throught the fire wall and figure out how to wire factory foglights, then everything is pretty much ready to go in.
To make it fit I just grinded rib of the FPR on that side where it it's the UIM, and the side of the bracket that holds the FPR on... Not sure if you're supposed to grind the FPR at all, I may have messed that up as well, but I do know that the intake now fits! Just have to fix this goddamn hole in it...
Anyhow, here it is FWIW.
Da Mota. All together finally, roller rocker finally helicoiled. Engine bay is mostly finished up. Have to master the fuel lines... not sure if I'm doing them right, no matter how much I tighten the compression fittings they seem to be able to fidget loose... Beyond that just have to run a amp power wire throught the fire wall and figure out how to wire factory foglights, then everything is pretty much ready to go in.
90 Beretta GTZ
93 Beretta GT
89 Beretta GTU
95 Beretta Z26
95 Aurora
07 Colorado Xtreme
Re: It's Geetee; and I have a GTU and a 3400 engine
Made some major progress today... finally got the damn engine in. A testament to just how solid the new poly filled mounts are the amount of time I spent trying to wrestle the damn thing in and bolt up all 4 mounts...
In other news, the headers I bought from Boner are crap. Maybe he didn't know just how poorly they were made. The front primarys barely line up to the exhaust ports (without pushing on them to line up), let alone the flanges lining up with the bolt holes... Those definatly need a new flange for them to work. The rears won't even line up, the angle is wrong. They must've been made for something else. There's no way I can possibly use these without having to modify them. I'd have to cut the rear flange off and even some of the primaries and re-angle it all... the front fits perfectly under the engine, no problem there, shouldn't have any ground clearance issues...
Not sure what my best option is... I'm going to have headers... I don't know if I'm better off trying to fix these or buy a cheap set used or something...
Jon, I noticed in Roberts build thread you said something about brazing the heater pipes to make the brackets fit on the engine or something, how hard was that to do? I've already gotten the long heater pipe that wraps around the front of the engine off of a 3100 Beretta, but I believe I have to use the other heater pipe (the one that pops into the 3500 LIM) with the o-ring style connection... that one doesn't seem to line up right, what's the best option there?
Here's some crappy pics so far.
90 Beretta GTZ
93 Beretta GT
89 Beretta GTU
95 Beretta Z26
95 Aurora
07 Colorado Xtreme
-
berettaboi
- Registered User
- Posts: 973
- Joined: Sun Mar 23, 2008 10:58 pm
- Location: canananada
Re: Project Cojones Updated
long read, but lots of good info! yes a good summary write up will be very valuable once you get her running!
4th one's a charm, 5th one is, beginnning to sound like this is an addiction...
95 black z26, '96 White z26 awaiting new life, and 2.5 mazda trucks
95 black z26, '96 White z26 awaiting new life, and 2.5 mazda trucks
-
3X00-Modified
- Administrator
- Posts: 10912
- Joined: Thu Jul 05, 2007 9:18 am
- Location: Brooklyn CT
Re: Project Cojones Updated
For the headers I wouldn't have expected them to line up easily since they have no cross brace between the flanges... without that they can bend and move anywhere... Not good for preload on the head studs though, so you might want to think about bracing them with a rod between primaries... once fitted.
As far as the rear, I'm guessing as EVERY set of headers out there unless modified for a Beretta or the Beta ones from WOT were designed to fit a J-body or N or W... So they fit it to a completely different firewall configuration, Ours is MUCH tighter back there and you probably have the same issue as a set of S&S headers would... If you've never seen this photo, this is how much I had to correct the S&S headers to work.

Rough starting angle

Rough finished angle

For brazing, I just cut the brackets off the pipes, re-bent the pipes to fit where I wanted allowing for the bracket to touch it, and then re-brazed them... Brazing is rather easy to do, and I mostly did it because I didn't have a welder handy and the braze leaves a cleaner finish.
Stock rear pressed pipe worked with little changes I only had to twist it to point down.
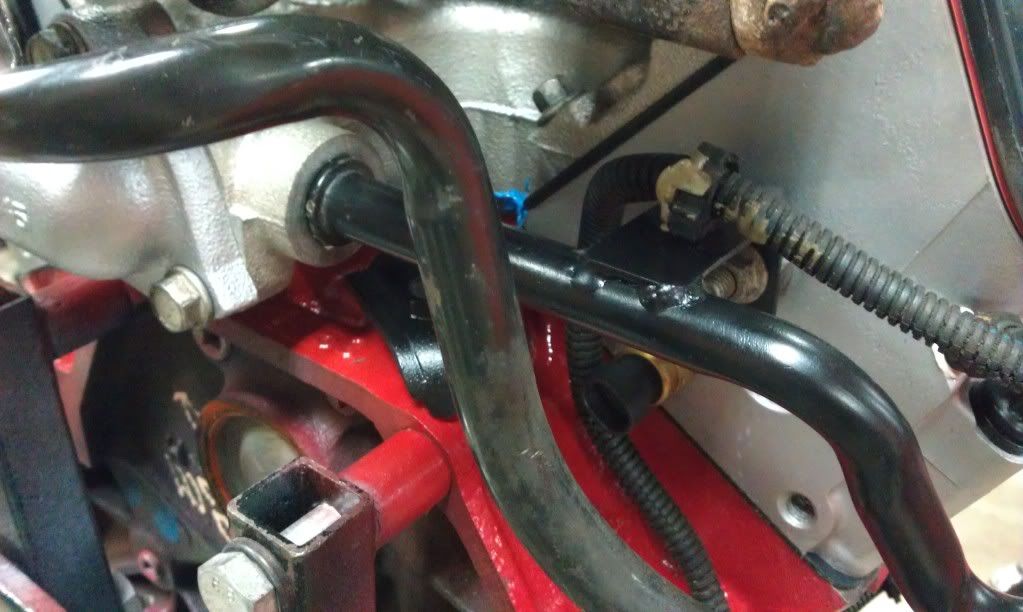
and I just had to change the postition of the top one to clear the headers better.
As far as the rear, I'm guessing as EVERY set of headers out there unless modified for a Beretta or the Beta ones from WOT were designed to fit a J-body or N or W... So they fit it to a completely different firewall configuration, Ours is MUCH tighter back there and you probably have the same issue as a set of S&S headers would... If you've never seen this photo, this is how much I had to correct the S&S headers to work.
Rough starting angle
Rough finished angle
For brazing, I just cut the brackets off the pipes, re-bent the pipes to fit where I wanted allowing for the bracket to touch it, and then re-brazed them... Brazing is rather easy to do, and I mostly did it because I didn't have a welder handy and the braze leaves a cleaner finish.
Stock rear pressed pipe worked with little changes I only had to twist it to point down.
and I just had to change the postition of the top one to clear the headers better.
Re: Project Cojones Updated
That's what I was planning on doing, WOT and that British car conversion place have flanges for 3x00's. What is that a degree wheel you were using to determine the angle?
I think I saw a thread where you had modified some kind of metal gasket for a header gasket? Seemed like you thought it was the best choice as far as sealing the header... I think you also mentioned header studs, vs. those locking studs that have the allen adjustment for locking them. I bought some of those from Boner as well, no good?
I think I saw a thread where you had modified some kind of metal gasket for a header gasket? Seemed like you thought it was the best choice as far as sealing the header... I think you also mentioned header studs, vs. those locking studs that have the allen adjustment for locking them. I bought some of those from Boner as well, no good?
90 Beretta GTZ
93 Beretta GT
89 Beretta GTU
95 Beretta Z26
95 Aurora
07 Colorado Xtreme
-
3X00-Modified
- Administrator
- Posts: 10912
- Joined: Thu Jul 05, 2007 9:18 am
- Location: Brooklyn CT
Re: Project Cojones Updated
I use allen cap screws to hold my headers in... never had one loosen up on me either. You can use whatever fits. And I've just taken stock gaskets and mapped where the flange runs between the ports and cut that section out of the stock gasket. Its the best one to use since its a MLS gasket and not some graphite thing that can blow out. I've never had sealing problems with them.
I was just using a magnetic base angle finder, nothing special, but when I first made the headers I did all the mods/test fitting to a car that was in a tent... I did that way back in like 07 IIRC. I didn't just guess at an angle and cut. Also that angle is only usable on that engine stand which I was in the process of making another set for someone so I just needed to see the difference.
I was just using a magnetic base angle finder, nothing special, but when I first made the headers I did all the mods/test fitting to a car that was in a tent... I did that way back in like 07 IIRC. I didn't just guess at an angle and cut. Also that angle is only usable on that engine stand which I was in the process of making another set for someone so I just needed to see the difference.
-
99GaGT3X00

- Registered User
- Posts: 804
- Joined: Tue Jan 11, 2005 1:56 pm
- Location: North Brookfield,MA
- Contact:
Re: Project Cojones Updated
i used slightly longer versions of the stock studs i got from Napa and they are still as tight as when i put the headers on a couple years ago.
the part that goes into the head is the same length. it's the part that sticks out of the heads that's longer, probably about a nuts length longer than stock.
the part that goes into the head is the same length. it's the part that sticks out of the heads that's longer, probably about a nuts length longer than stock.

3400/3500 Hybrid
227/233@.050 .515.515 lift 112LSA
15.232@88.85mph on stock 3400
99 Grand Am GT------03 Subaru Outback H6
Re: Project Cojones Updated
And yesterday I recieved my Airaid UBI intake tube in the mail, and made this:
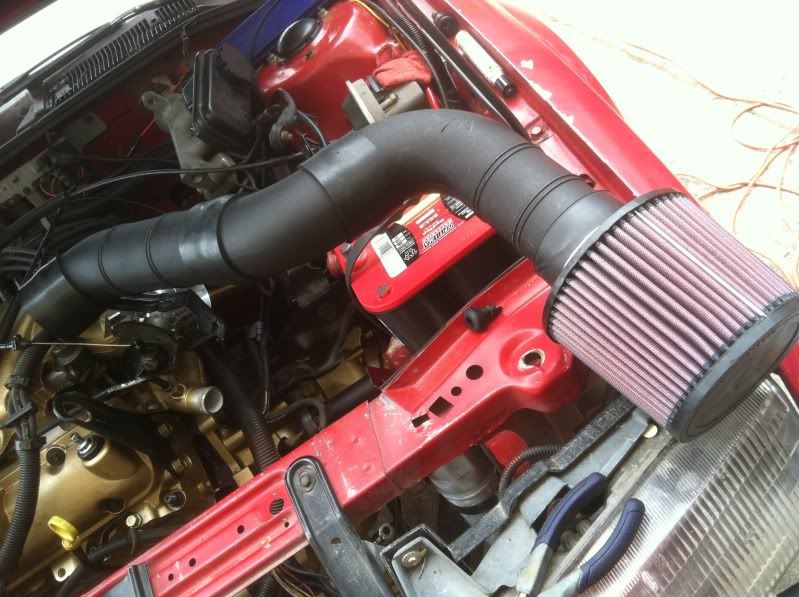
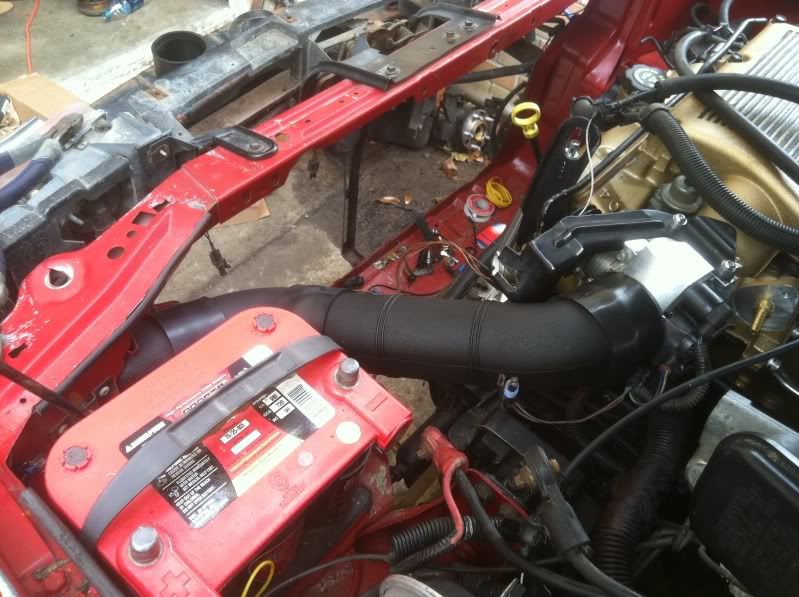

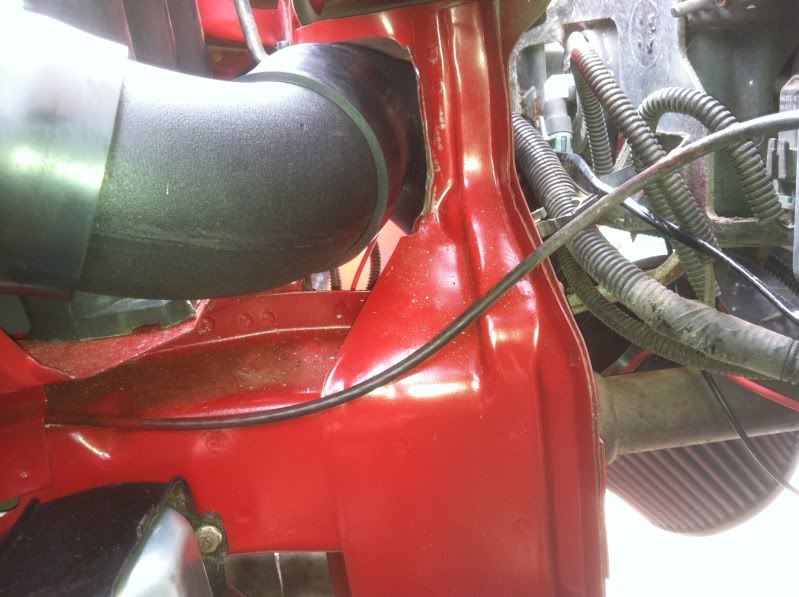
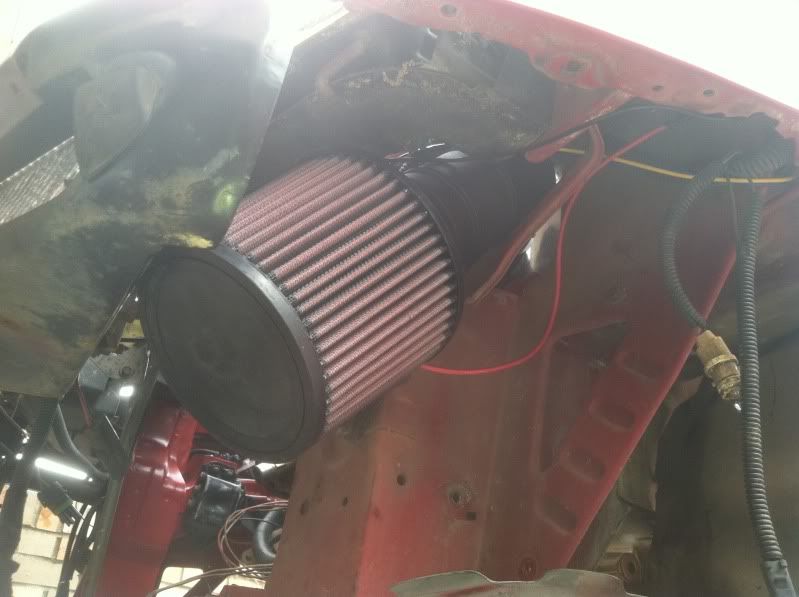
Wasn't too hard to make, took maybe an hour or so. Used 2 45* bends, and a 90*. I'll write up a walk through of how to do it in case anyone else to. The tube itself cost around $80 shipped. I myself just prefer the look of something which looks stock or OEM, that's why I went with it. Minimal modifcations, just had to spread open that one part of the body that the intake goes through. Filter sits right behind the turn signals behind the bumper, should be a really good setup and make for some good power.
Wasn't too hard to make, took maybe an hour or so. Used 2 45* bends, and a 90*. I'll write up a walk through of how to do it in case anyone else to. The tube itself cost around $80 shipped. I myself just prefer the look of something which looks stock or OEM, that's why I went with it. Minimal modifcations, just had to spread open that one part of the body that the intake goes through. Filter sits right behind the turn signals behind the bumper, should be a really good setup and make for some good power.
90 Beretta GTZ
93 Beretta GT
89 Beretta GTU
95 Beretta Z26
95 Aurora
07 Colorado Xtreme
Re: Project Cojones Updated
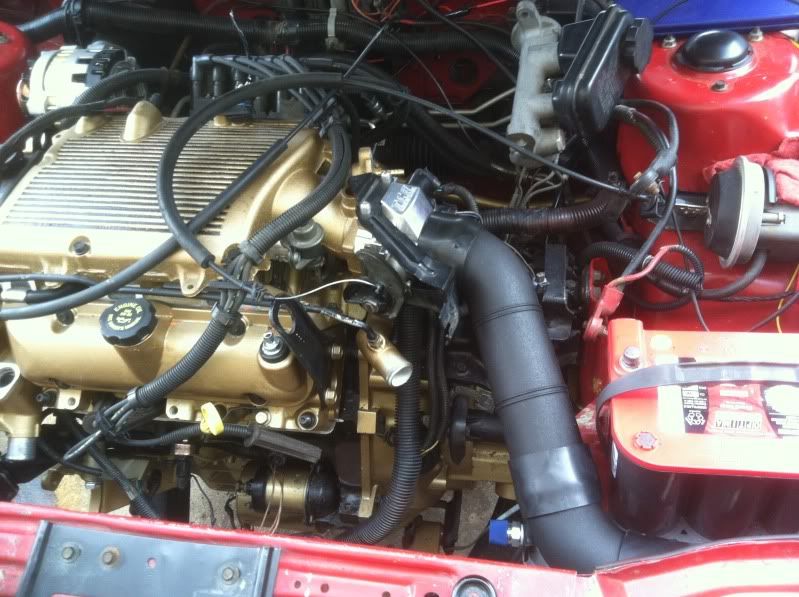
I will make a point to say something about the CAI on our cars.
I found with the CAI installed on the base, I got a LOT of cold air condensation in the engine oil. I mean A LOT!.
It would even cause slime to appear on the bottom of the oil cap. Now at the same time, the car had been running on Quaker State dino oil. But, once I moved the CAI to a WAI, all that stopped, and I haven't lost anything with the performance. But keep in mind, there is cooler weather up here too as an average.
Just thought I would mention that, not sure if anyone else running a CAI has ever seen water condensation in their oil...
94' Z26 Project - 95' Base Project - Custom LED Light Conversions!
Chosen Proposal Submission & Committee Member for Beretta Fest 2012 in Traverse City Michigan


Chosen Proposal Submission & Committee Member for Beretta Fest 2012 in Traverse City Michigan
Re: Project Cojones Updated
The CAI should not cause that issue unless you're pcv is gunked and or the vent port hooked to the cai tube is emitting a lot of excessive blow by allowing the engine to resuck the spent oil back through the intake.
I ran many packs of ice on my intake manifold during tuning to isolate the temps and it never had those effects. Just caused oxidation on the surfaces where I had the ice.
I ran many packs of ice on my intake manifold during tuning to isolate the temps and it never had those effects. Just caused oxidation on the surfaces where I had the ice.
_________
-------------
-------------
Re: Project Cojones Updated
Then explain why that after I swapped it, it went away? lol
I mean think about it:
You have cold weather. You have been driving, so your engine is warm now. You shut the car off and go inside. The car has warmer air around the engine compartment for a while as it cools. As the engine cools, it slowly draws air into the intake (as air cools, its volume shrinks) which brings in much colder air from outside the engine bay. That cold air, then condensates on the warmer engine parts within the intake path. Leading to water condensation, etc. on various engine parts, valve areas, etc. Keep in mind it may be hours before all that occurs, but it can happen.
But since I moved the intake filter to the engine bay, its now located where the heat is, so... The air being drawn in is much closer in temperature to the engine's, so less condensation if any.
Makes sense to me. If you ran it with ice on it, that's fine, but you didn't leave it on there while the engine wasn't running? I can see it not doing it while its running. This happens when it cools down on cold days is my point.
The "gunk" would be a whitish buildup on the bottom of the oil fill cap. But since I made the change, haven't seen any since. Before, I seen it a lot, and was even getting a lot of lifter knocking. The switch to synthetic also could be playing a small part too, since these changes happened within a couple of fill ups of each other. But I doubt it. I did the filter move nearly a month before the oil change and noticed a difference within a couple days, especially with the lifter noises.
Ah well. Just thought I would mention it and see, as I was curious. Pardon the rambling off-topic post.
94' Z26 Project - 95' Base Project - Custom LED Light Conversions!
Chosen Proposal Submission & Committee Member for Beretta Fest 2012 in Traverse City Michigan
Chosen Proposal Submission & Committee Member for Beretta Fest 2012 in Traverse City Michigan