Cammed Turbo 3500 Build ** w/ TON OF PICTURES **
Cammed Turbo 3500 Build ** w/ TON OF PICTURES **
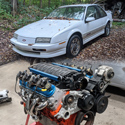
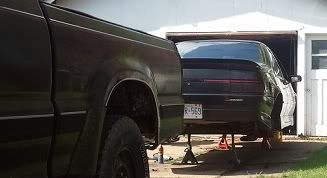
I know you guys around here would do it the other way around but I thought it could be interesting still so here it is. I bought lx9power beretta (3500 swapped) late 2012. Pretty much everything was fucked except the engine. So, I'm taking the engine out, doing a mild build and installing it in my already turbo car, 1993 cavalier z24 (currently 3400).
Here are all the pictures of progress. Sorry if the captions doesn't always make sense, this is copy pasted from multiple posts of my thread on another forum.
Build:
- ARP head studs
- ARP rod bolts
- WOT-TECH street/strip turbo cam with pushrods
- Teflon coated wide cam bearings
- Compcam 26915 valve springs
- TCE DRTC
- GM graphite head gaskets with GM intake gaskets
- Top pistons rings re-gaped for boost (0.025" instead of ~0.012")

Before:

During:

Almost!

Done:

Now to tear down into that engine and install the goodies
Anyway, tonight's plan was to remove the plenum and clean it, but...

Clean head, sweet!

Looks clean... Is that GM that use this gasket maker mess or someone was in there before me ?

Never seen intake ports that clean :O

Pistons looks good too!

And they clean really easy, that's good!

Continuing today, removing some more stuff

Cleaned and painted the LIM and valve covers, that took forever

Cleaned the pistons

Flipped the block upside down, time to get the crank out!

Rod bearings all looked like this, that's good!

Why GM install the ring gaps so close ? Or do they turn on the pistons over time ? Oh well... I won't reinstall them like that

Bare block!

Crank has some weird mark, is that a forged crank or not ? :|

Got a POR15 engine paint kit, chevy red, gonna use that on the block, 101$ :O

Looks very complete at least!

Dropped the crank at the machine shop on monday to be machined for the double roller timing chain. No news yet Hopefully next week I will have it back.
Anyway, I painted the block chevy red, cleaned and painted the timing cover and started removing some material on the inside to clear the DRTC.
Plenum and heads are next now.
Few pics:


Finally got a call from the machine shop yesterday that my crank was ready so I picked it up this morning.

Looks like they did a decent job

This thing should fit fine now... so much more beefier than the stock one (which felt a bit stretched also and this is not even an high mileage engine)

Got the plenum cleaned and painted... slowly but surely!

Block looks good now that the paint is fully dry

Compcam 26915! I never had an issue with those so the 3500 got a set of those as well!

YAY!

Didn't realize this springs compressor was that big until I got it but I don't care, almost died once with a crap valve compressor, I would rather have an overkill one now (heads need to be cleaned still)

Both heads done!

GM is using the second set of threads as a spacer ? DAFUQ, that sounds gettho for OEM ? ARP bolts seems a much better design

ARP rod bolts installed

Painted the oil pump drive thingy and bracket/bolt

Oil pan painted and magnetic drain plug installed

Head after a basic cleanup, those graphite gaskets stick really well :-?

Used a marble table, a bunch sand papers, contact glue and 6 beers. 1h30 per head later, ended up with clean heads!

I wasn't sure if I should replace the cam bearings or not but after seeing the bearings, I had no choice.

Good thing I got a set of those from WOT-Tech just in case

New cam bearings VS old one

GM stock bearings are a real joke

Cam bearings going in, not easy!

All done

Cam and Comp Cam engine assembly lube

Ready to go

Cam going in!

Starting on the DRTC install!

Block ready to go

Crank back in

TCE Timing chain

Timing

Top ring gapped to 0.025 (from about 0.012 :O), bottom ring untouched

Bottom assembled with ARP rod bolts

Pistons all back in

ARP head studs :love:

GM graphite gaskets

Starting to look like an engine again

ARP head studs awesomeness!

GM lower intake gaskets and custom pushrod matched with the cam


I think this is a bit overkill but added some RTV there just in case

Got the LIM back on

Oil pan temporary on (waiting on fittings for turbo drain)

Front main seal looks so much better on 3500 than 3400, I guess I will use that on 3400 as well from now on. They always leak on 3.1/3400 :/

Crank trigger and UIM on

Mostly done, just need to finalize a few things, YAY!


And a before / after pic just for fun, geeeeeeeez

Here are all the pictures of progress. Sorry if the captions doesn't always make sense, this is copy pasted from multiple posts of my thread on another forum.
Build:
- ARP head studs
- ARP rod bolts
- WOT-TECH street/strip turbo cam with pushrods
- Teflon coated wide cam bearings
- Compcam 26915 valve springs
- TCE DRTC
- GM graphite head gaskets with GM intake gaskets
- Top pistons rings re-gaped for boost (0.025" instead of ~0.012")
Before:
During:
Almost!
Done:
Now to tear down into that engine and install the goodies
Anyway, tonight's plan was to remove the plenum and clean it, but...
Clean head, sweet!
Looks clean... Is that GM that use this gasket maker mess or someone was in there before me ?
Never seen intake ports that clean :O
Pistons looks good too!
And they clean really easy, that's good!
Continuing today, removing some more stuff
Cleaned and painted the LIM and valve covers, that took forever
Cleaned the pistons
Flipped the block upside down, time to get the crank out!
Rod bearings all looked like this, that's good!
Why GM install the ring gaps so close ? Or do they turn on the pistons over time ? Oh well... I won't reinstall them like that
Bare block!
Crank has some weird mark, is that a forged crank or not ? :|
Got a POR15 engine paint kit, chevy red, gonna use that on the block
Looks very complete at least!
Dropped the crank at the machine shop on monday to be machined for the double roller timing chain. No news yet
Anyway, I painted the block chevy red, cleaned and painted the timing cover and started removing some material on the inside to clear the DRTC.
Plenum and heads are next now.
Few pics:
Finally got a call from the machine shop yesterday that my crank was ready so I picked it up this morning.
Looks like they did a decent job
This thing should fit fine now... so much more beefier than the stock one (which felt a bit stretched also and this is not even an high mileage engine)
Got the plenum cleaned and painted... slowly but surely!
Block looks good now that the paint is fully dry
Compcam 26915! I never had an issue with those so the 3500 got a set of those as well!
YAY!
Didn't realize this springs compressor was that big until I got it but I don't care, almost died once with a crap valve compressor, I would rather have an overkill one now
Both heads done!
GM is using the second set of threads as a spacer ? DAFUQ, that sounds gettho for OEM ? ARP bolts seems a much better design
ARP rod bolts installed
Painted the oil pump drive thingy and bracket/bolt
Oil pan painted and magnetic drain plug installed
Head after a basic cleanup, those graphite gaskets stick really well :-?
Used a marble table, a bunch sand papers, contact glue and 6 beers. 1h30 per head later, ended up with clean heads!
I wasn't sure if I should replace the cam bearings or not but after seeing the bearings, I had no choice.
Good thing I got a set of those from WOT-Tech just in case
New cam bearings VS old one
GM stock bearings are a real joke
Cam bearings going in, not easy!
All done
Cam and Comp Cam engine assembly lube
Ready to go
Cam going in!
Starting on the DRTC install!
Block ready to go
Crank back in
TCE Timing chain
Timing
Top ring gapped to 0.025 (from about 0.012 :O), bottom ring untouched
Bottom assembled with ARP rod bolts
Pistons all back in
ARP head studs :love:
GM graphite gaskets
Starting to look like an engine again
ARP head studs awesomeness!
GM lower intake gaskets and custom pushrod matched with the cam
I think this is a bit overkill but added some RTV there just in case
Got the LIM back on
Oil pan temporary on (waiting on fittings for turbo drain)
Front main seal looks so much better on 3500 than 3400, I guess I will use that on 3400 as well from now on. They always leak on 3.1/3400 :/
Crank trigger and UIM on
Mostly done, just need to finalize a few things, YAY!
And a before / after pic just for fun, geeeeeeeez

-
woody90gtz
- Registered User
- Posts: 4701
- Joined: Thu Jul 11, 2002 8:45 pm
- Location: Walton, NY
- Contact:
Re: Cammed Turbo 3500 Build ** w/ TON OF PICTURES **
Looks really sharp. I like it.
91 "SS" - WOT 3400/5spd - 13.29@101.6 - World's fastest N/A FWD Beretta
96 "T56" LS/6spd/8.8 RWD swap - 13.45@104.7 lol
GEARHEAD dezign youtube
96 "T56" LS/6spd/8.8 RWD swap - 13.45@104.7 lol
GEARHEAD dezign youtube
Re: Cammed Turbo 3500 Build ** w/ TON OF PICTURES **
You have to man, there is no chrome on itwoody90gtz wrote:Looks really sharp. I like it.
Thanks!
-
3X00-Modified

- Administrator
- Posts: 10912
- Joined: Thu Jul 05, 2007 9:18 am
- Location: Brooklyn CT
Re: Cammed Turbo 3500 Build ** w/ TON OF PICTURES **
Doing a lot of work but then you hand sanded the heads :/ should be ok but I always have mine milled at a shop just to be sure they are good.
I need to build a Damn full 3500 now that I can make my own trans bracket. Back in 07 I just didn't have the tools to do it.
Is that a gm front seal or do the aftermarket companies make a comparable seal for the 3500?
I need to build a Damn full 3500 now that I can make my own trans bracket. Back in 07 I just didn't have the tools to do it.
Is that a gm front seal or do the aftermarket companies make a comparable seal for the 3500?

Re: Cammed Turbo 3500 Build ** w/ TON OF PICTURES **
I agree doing it on a marble table with some very thin feeler gauge would ensure that the outer edges were flat but not the inner areas, machining them with a fly cutter or something would have ensured a much flatter surface overall, But if he was careful enough with a sanding block you should probably be okay..3X00-Modified wrote:Doing a lot of work but then you hand sanded the heads :/ should be ok but I always have mine milled at a shop just to be sure they are good.
You and me both Jon!3X00-Modified wrote:I need to build a Damn full 3500 now that I can make my own trans bracket. Back in 07 I just didn't have the tools to do it.
Where you build two I take one
And if you could draw up a trans bracket I could CNC whatever you/i would need
1 Of 1 Street Legal Centri S/c Beretta's In Existance
-
3X00-Modified
- Administrator
- Posts: 10912
- Joined: Thu Jul 05, 2007 9:18 am
- Location: Brooklyn CT
Re: Cammed Turbo 3500 Build ** w/ TON OF PICTURES **
I'd probably build a template from plate steel and just plasma it out, I think CNCing the parts would just be stupid expensive, it's mostly flat surfaces that you can all 90* weld together rather than bending it like the factory one.
Re: Cammed Turbo 3500 Build ** w/ TON OF PICTURES **
Or FloJet3X00-Modified wrote:I'd probably build a template from plate steel and just plasma it out, I think CNCing the parts would just be stupid expensive, it's mostly flat surfaces that you can all 90* weld together rather than bending it like the factory one.
1 Of 1 Street Legal Centri S/c Beretta's In Existance
-
Money pit Beretta
- Registered User
- Posts: 6411
- Joined: Thu Jul 26, 2007 11:36 am
- Location: Kansas
Re: Cammed Turbo 3500 Build ** w/ TON OF PICTURES **
Boy and I thought I went a little crazy with the Ultra Copper. Someone went nuts with that on the LIMG.
keep'em flying!
Re: Cammed Turbo 3500 Build ** w/ TON OF PICTURES **
The front seal is straight from the dealer!
I knew you guys would freak out about the heads but I'm sure they will be more than fine. I used to do it with a sander and sometime even by hand. Only time I had HG problem (on maybe 5+ engines) is when I used felpro crap but I'm 99.9% sure it was the gaskets fault, so I will continue to save 100$ there
I knew you guys would freak out about the heads but I'm sure they will be more than fine. I used to do it with a sander and sometime even by hand. Only time I had HG problem (on maybe 5+ engines) is when I used felpro crap but I'm 99.9% sure it was the gaskets fault, so I will continue to save 100$ there
-
heavywoody
- Global Moderator
- Posts: 1991
- Joined: Sun Nov 03, 2002 4:10 pm
- Location: Concord, NC
- Contact:
Re: Cammed Turbo 3500 Build ** w/ TON OF PICTURES **
This looks great, and gives me some ideas...
But why would you put the upper intake on with no fuel injectors/fuel rails?
But why would you put the upper intake on with no fuel injectors/fuel rails?
Geoff
95 Z26 Turbo 3400 5spd - R&D Project
Beretta Preservation Society - Director of Acquisitions

95 Z26 Turbo 3400 5spd - R&D Project
Beretta Preservation Society - Director of Acquisitions
Re: Cammed Turbo 3500 Build ** w/ TON OF PICTURES **
Well, just to see what it looks like, it takes 2 seconds to remove... I'm reusing my 65lbs injectors and dual feed fuel rail.

Re: Cammed Turbo 3500 Build ** w/ TON OF PICTURES **
Very nice work. Thanks for all the pics, it is great when people take the time to share the details of a build-up like this. It is also great to see work from someone who actually knows how to build and engine. I didn't see any plasti-gauge, but if the crank-journals weren't touched and you re-used original bearings, it isn't strictly necessary. Taking the time to clearance the gaps on piston-rings is part of the difference between someone who does the job right and someone who slaps junk together. I'll say it again, nice work. Personally, I don't have any problem with it going into your Z-24, I'm looking forward to the next installation of pictures, thanks for sharing.
1989 SuperCharged 3800 Srs-II (First)Six-Speed GTU
1990 Turbo 3.4 5-Speed T-Type
1990 4.0L 4-Cam 32-Valve V-8 5-Speed Indy GTi (Project)
1990 Stock(!) 3.1 MPFI Auto Indy
1995 LA1/L82 4T60E Z-26
1995 3.4 DOHC Turbo 5-Speed Z-26
1990 Turbo 3.4 5-Speed T-Type
1990 4.0L 4-Cam 32-Valve V-8 5-Speed Indy GTi (Project)
1990 Stock(!) 3.1 MPFI Auto Indy
1995 LA1/L82 4T60E Z-26
1995 3.4 DOHC Turbo 5-Speed Z-26
Re: Cammed Turbo 3500 Build ** w/ TON OF PICTURES **
Thanks. I don't actually know how to build an engine Well, it's my first from a bare block anyway. I didn't plasti gauge the bearings because everything went back in as it came out. Every time I did it before turned out to be a major waste of time so I said f** it for this time.
Pistons rings I wanted to do to have more room for mistake. Now tuning (or whatever lean condition) mistake can last longer before the ring end will touch together and explode the pistons. It can still happen tho, ask me how I know
Glad you liked the pics, wouldn't seeing some of your L67 beretta and especially F40 swap
-
berettaboi
- Registered User
- Posts: 973
- Joined: Sun Mar 23, 2008 10:58 pm
- Location: canananada
Re: Cammed Turbo 3500 Build ** w/ TON OF PICTURES **
looks awesome! and makes me watna 3500 really bad now... although i wouldn't be doing anything to it... damn you
4th one's a charm, 5th one is, beginnning to sound like this is an addiction...
95 black z26, '96 White z26 awaiting new life, and 2.5 mazda trucks
95 black z26, '96 White z26 awaiting new life, and 2.5 mazda trucks
-
3X00-Modified
- Administrator
- Posts: 10912
- Joined: Thu Jul 05, 2007 9:18 am
- Location: Brooklyn CT
Re: Cammed Turbo 3500 Build ** w/ TON OF PICTURES **
With the way things are machined these days, Plasti-gauge and sending pistons in with an engine block to be bored are really old school methods and not really needed. I always gap rings on a new ring installation since if you don't it can create some major issues... Especially on a FI build.
Everyone was having a coronary when I said I sent my Subaru block in with out the pistons yet when I got it back my bore gauge measured them all in at .0025"-.003" clearance. I also had the crank checked and it was within spec so I just used OEM sized new bearings. Most of the checking with plasti-gauge is to ensure the parts you have are within spec as well as the crank, if you can't measure them in another way.
Everyone was having a coronary when I said I sent my Subaru block in with out the pistons yet when I got it back my bore gauge measured them all in at .0025"-.003" clearance. I also had the crank checked and it was within spec so I just used OEM sized new bearings. Most of the checking with plasti-gauge is to ensure the parts you have are within spec as well as the crank, if you can't measure them in another way.