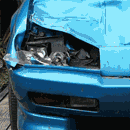
DTMAce's Z26 project - DD usage for the time being - 6-8-12
Re: DTMAce's project continues.... 4-12-2010
Interesting.... I can see this being more useful say on a car that wasn't already rusted to crap... lol
94' Z26 Project - 95' Base Project - Custom LED Light Conversions!
Chosen Proposal Submission & Committee Member for Beretta Fest 2012 in Traverse City Michigan


Chosen Proposal Submission & Committee Member for Beretta Fest 2012 in Traverse City Michigan
-
3X00-Modified

- Administrator
- Posts: 10920
- Joined: Thu Jul 05, 2007 9:18 am
- Location: Brooklyn CT
Re: DTMAce's project continues.... 4-12-2010
No it doesnt and thats why I took the time to find a shell that didn't have a ton of miles on it and rust... Hell I already tried that one, now that car is sitting in my driveway since its finally been replaced. That one had rust at 74k when I bought it and just got worse, and its got 340k on itDTMAce wrote:I wish mine had looked like that. But I have a feeling yours doesn't have 220k on the body as a DD either.
Good luck.
Re: DTMAce's project continues.... 4-12-2010
Thanks, I'm going to need it. :p
94' Z26 Project - 95' Base Project - Custom LED Light Conversions!
Chosen Proposal Submission & Committee Member for Beretta Fest 2012 in Traverse City Michigan
Chosen Proposal Submission & Committee Member for Beretta Fest 2012 in Traverse City Michigan
Re: DTMAce's project continues.... 4-12-2010
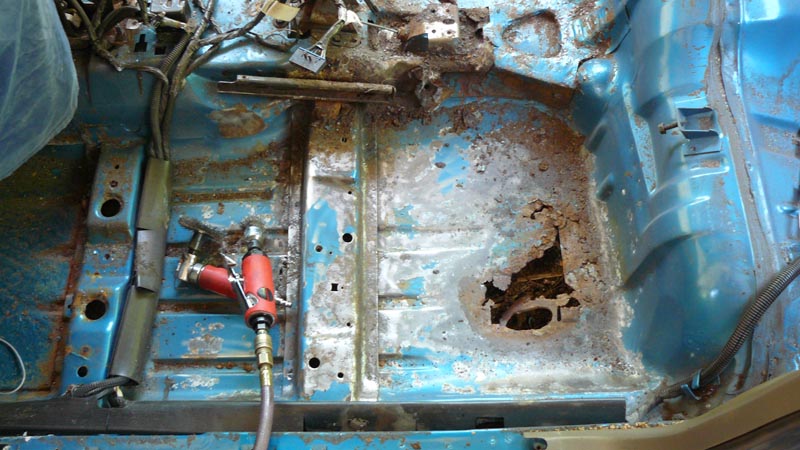
For Kyle, I think this floor pan is worse than what you had to work with, judging from the pics... lol I worked on it a bit today actually. Been wanting to try out my cheap air grinders for awhile now. Actually they work pretty good. Once I had some compatible speed brushes. lol
This was 10 minutes. I had to stop, was getting too much crap in me. Have to find my breath mask! Anyway, here are some shots of what it is starting to look like. I am feeling better about it already. It is pretty solid, other than that one obvious big @$$ hole, but there are a few pinholes too. The worst area really is going to be on the side of the console hump. I had already previously patched that area where the seat bracket mounts as it had rusted through. Well the patch is now rusted through, so going to have to fix this again. Ugh.
Got to buy some stuff this weekend to seal it up.
Here are some pics!
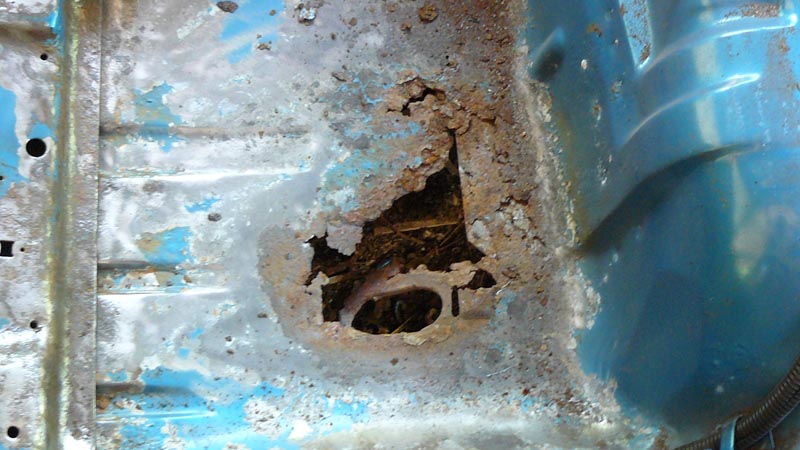
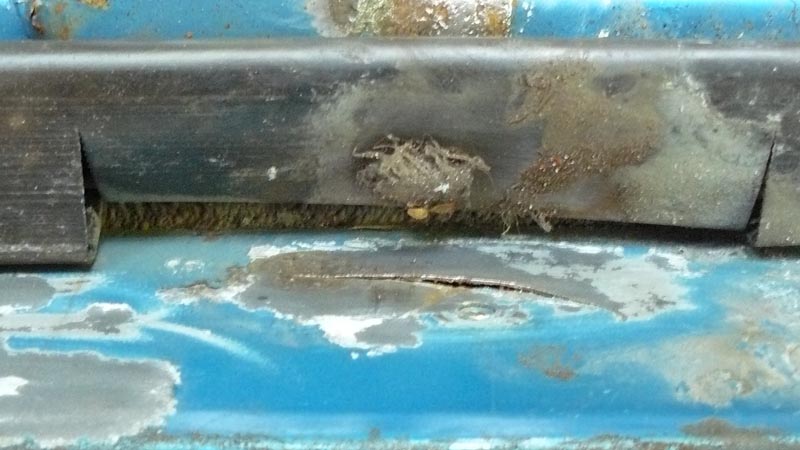
Oh, that crack is from the left bracket mount for the driver's seat, back bolt. Need to weld this, obviously my 6'7" ass is a bit much for these mounts..

Hope to get more of this work done later today. Have to work on a few computers now. Yay.
Later all.
This was 10 minutes. I had to stop, was getting too much crap in me. Have to find my breath mask! Anyway, here are some shots of what it is starting to look like. I am feeling better about it already. It is pretty solid, other than that one obvious big @$$ hole, but there are a few pinholes too. The worst area really is going to be on the side of the console hump. I had already previously patched that area where the seat bracket mounts as it had rusted through. Well the patch is now rusted through, so going to have to fix this again. Ugh.
Got to buy some stuff this weekend to seal it up.
Here are some pics!
Oh, that crack is from the left bracket mount for the driver's seat, back bolt. Need to weld this, obviously my 6'7" ass is a bit much for these mounts..
Hope to get more of this work done later today. Have to work on a few computers now. Yay.
Later all.
94' Z26 Project - 95' Base Project - Custom LED Light Conversions!
Chosen Proposal Submission & Committee Member for Beretta Fest 2012 in Traverse City Michigan
Chosen Proposal Submission & Committee Member for Beretta Fest 2012 in Traverse City Michigan
-
3X00-Modified
- Administrator
- Posts: 10920
- Joined: Thu Jul 05, 2007 9:18 am
- Location: Brooklyn CT
Re: DTMAce's project continues.... 4-12-2010
And here I was worrying about just tuning my car and swapping seats before bfest... I give you props for taking this much on so close to the deadline.
-
Money pit Beretta

- Registered User
- Posts: 6411
- Joined: Thu Jul 26, 2007 11:36 am
- Location: Kansas
Re: DTMAce's project continues.... 4-12-2010
Boy if someone had a way to make patch panels for our cars they could make alot of money.
keep'em flying!
Re: DTMAce's project continues.... 4-12-2010
No kidding.
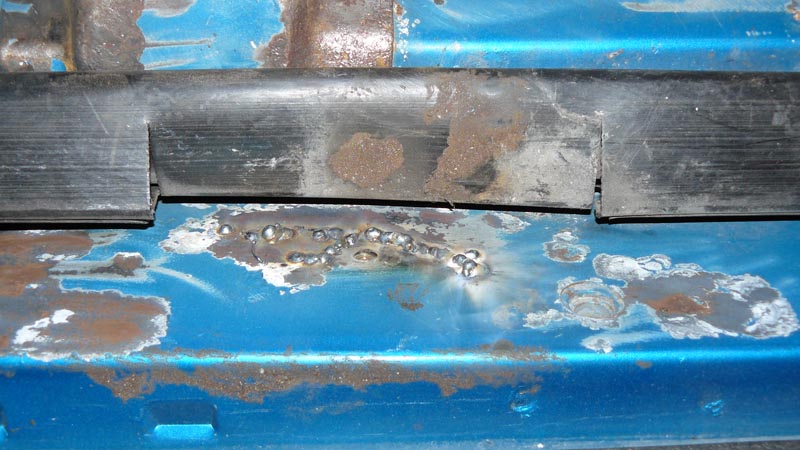
Ok, here is as far as I got today. Result of about 2 hours total for all day, using air tools to wire brush the worst of it. I really broke those things in on this project. Now I have to clean them. lol This was after I cleaned up most of the debris with a shop vac.
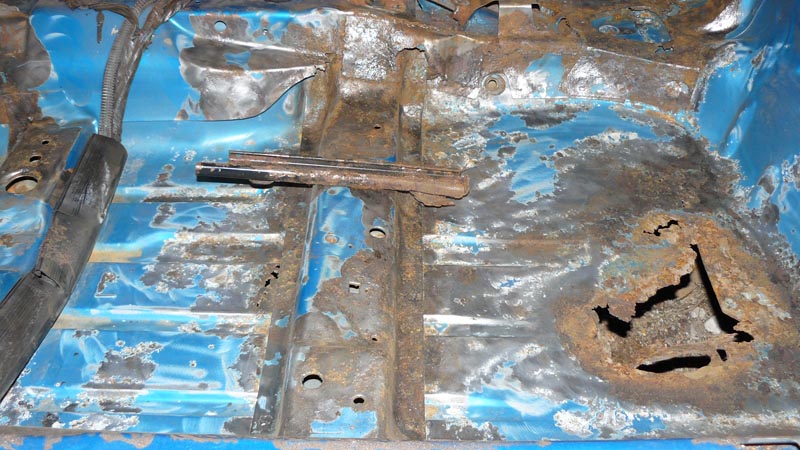
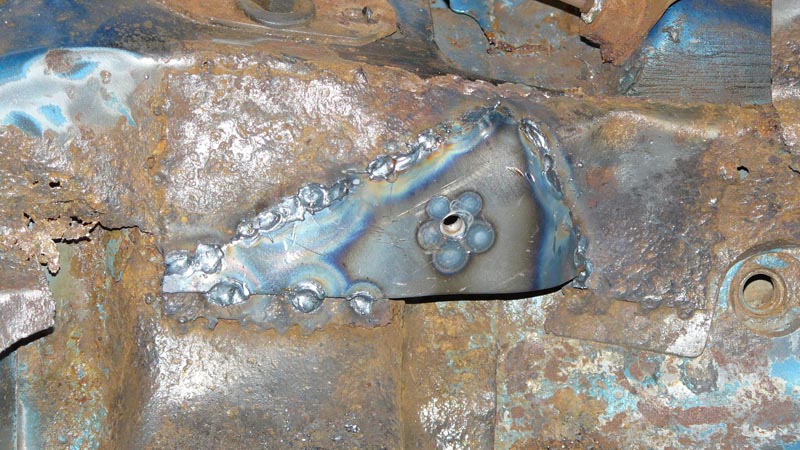
OK, this was a shot from the drivers side, as you can see the rail is really just junk. I have to pull the mount off the rail, clean the threads and once again, re-weld it back in. I NEED A NEW RAIL! If anyone has a spare, please let me know asap!
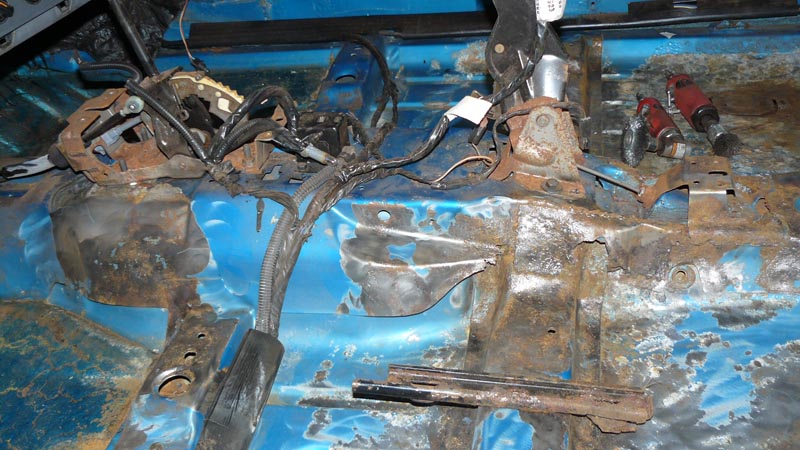
Console. Actually, the rear portion of this is really fucked up rust wise, from the e-brake mount back. Passenger side isn't bad though. The rest is a paint peeling nightmare, but solid.
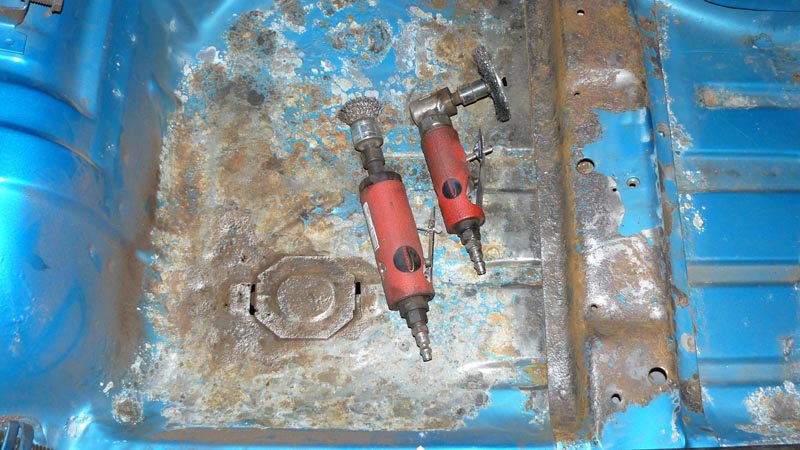
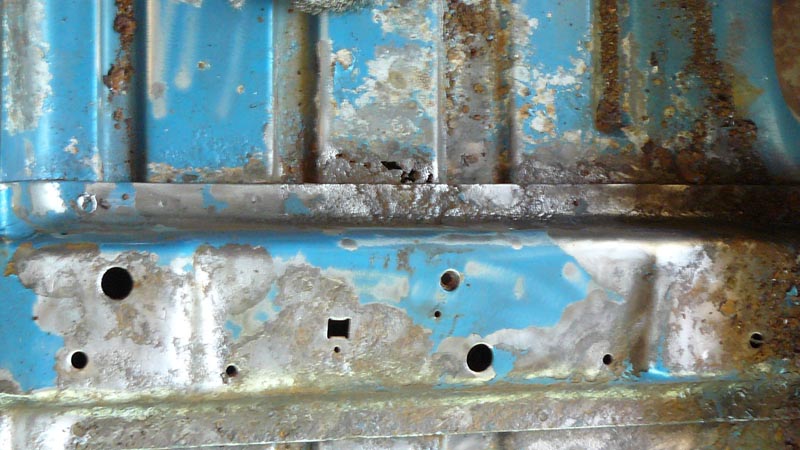
Passenger side rear foot well. Actually it wasn't bad at all. Even the plate is still solid. So this will be easy to fix. Couple pin holes forward near the crossbrace, but that's it. Oh, and the two air tools. lol Poor things.
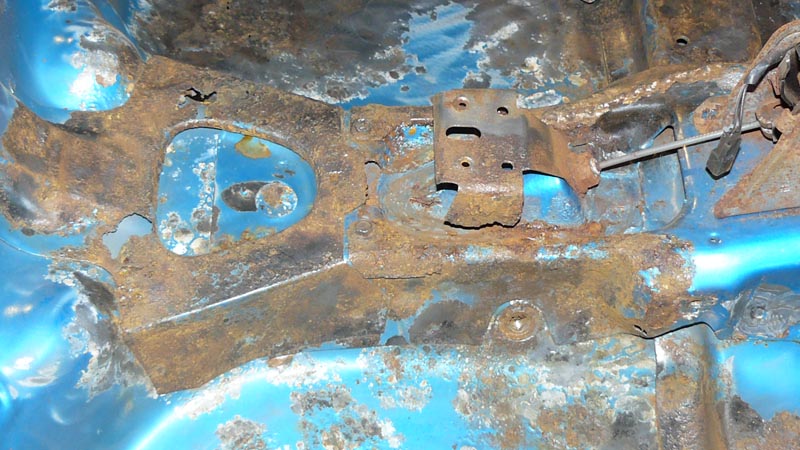
Passenger side of the rear portion of the console/hump. As you can see, not bad on this side, but the top and the rear structure brace are pretty bad. May have to cut it out and replace with new sheet metal or something.
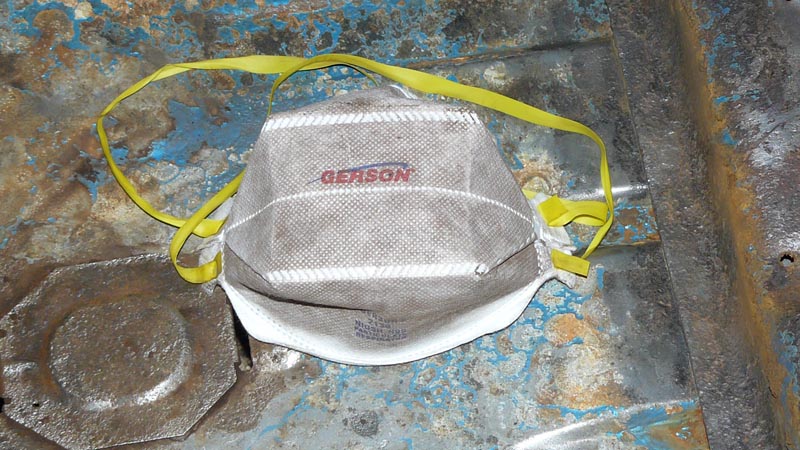
Yeah, this was pure white and new when I started. An hour of breathing through it while wire wheeling did that. Imagine what your lungs would have looked like? lol
Anyways, tomorrow won't see much on this as I have too much other crap to do. Will be going shopping this weekend for some rust converter, and hope to have the welding happening before the end of Sunday. I want to have this prepped and painted by mon/tues so it has time to cure. Treating the rust areas, then painting with black rubber undercoat. Then reassemble. Not sure if I will get to the lower pillars or not yet. May have to wait and do those later, but will see. May talk my father into looking at them, see what he thinks. He is the welding king anyway. lol
And as far as deadlines go, well 3 weeks isn't bad, but trying to get this done a week before would have been near impossible. Once this is all done, I still have to get new front wheel bearings in, and the A/C compressor installed/charged. Ugh.
Ok, here is as far as I got today. Result of about 2 hours total for all day, using air tools to wire brush the worst of it. I really broke those things in on this project. Now I have to clean them. lol This was after I cleaned up most of the debris with a shop vac.
OK, this was a shot from the drivers side, as you can see the rail is really just junk. I have to pull the mount off the rail, clean the threads and once again, re-weld it back in. I NEED A NEW RAIL! If anyone has a spare, please let me know asap!
Console. Actually, the rear portion of this is really fucked up rust wise, from the e-brake mount back. Passenger side isn't bad though. The rest is a paint peeling nightmare, but solid.
Passenger side rear foot well. Actually it wasn't bad at all. Even the plate is still solid. So this will be easy to fix. Couple pin holes forward near the crossbrace, but that's it. Oh, and the two air tools. lol Poor things.
Passenger side of the rear portion of the console/hump. As you can see, not bad on this side, but the top and the rear structure brace are pretty bad. May have to cut it out and replace with new sheet metal or something.
Yeah, this was pure white and new when I started. An hour of breathing through it while wire wheeling did that. Imagine what your lungs would have looked like? lol
Anyways, tomorrow won't see much on this as I have too much other crap to do. Will be going shopping this weekend for some rust converter, and hope to have the welding happening before the end of Sunday. I want to have this prepped and painted by mon/tues so it has time to cure. Treating the rust areas, then painting with black rubber undercoat. Then reassemble. Not sure if I will get to the lower pillars or not yet. May have to wait and do those later, but will see. May talk my father into looking at them, see what he thinks. He is the welding king anyway. lol
And as far as deadlines go, well 3 weeks isn't bad, but trying to get this done a week before would have been near impossible. Once this is all done, I still have to get new front wheel bearings in, and the A/C compressor installed/charged. Ugh.
94' Z26 Project - 95' Base Project - Custom LED Light Conversions!
Chosen Proposal Submission & Committee Member for Beretta Fest 2012 in Traverse City Michigan
Chosen Proposal Submission & Committee Member for Beretta Fest 2012 in Traverse City Michigan

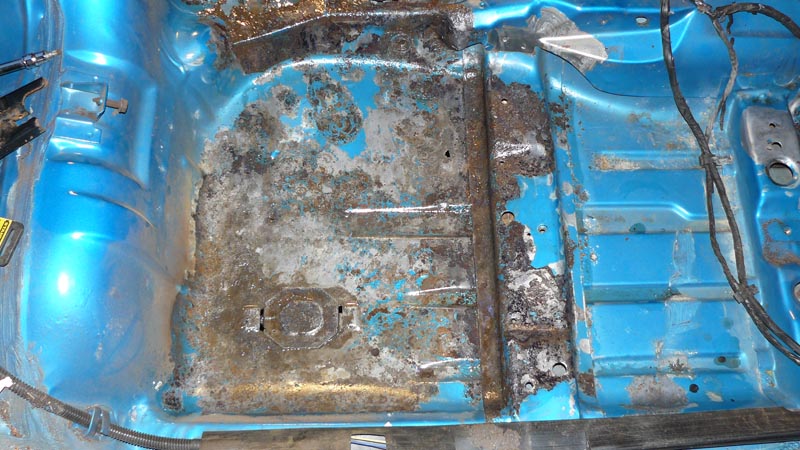
Re: DTMAce's project continues....5-26 - Floor Pan Disaster!
dear god!!! I love you California, for this reason only.
dude, git ir dun!
dude, git ir dun!

Re: DTMAce's project continues....5-26 - Floor Pan Disaster!
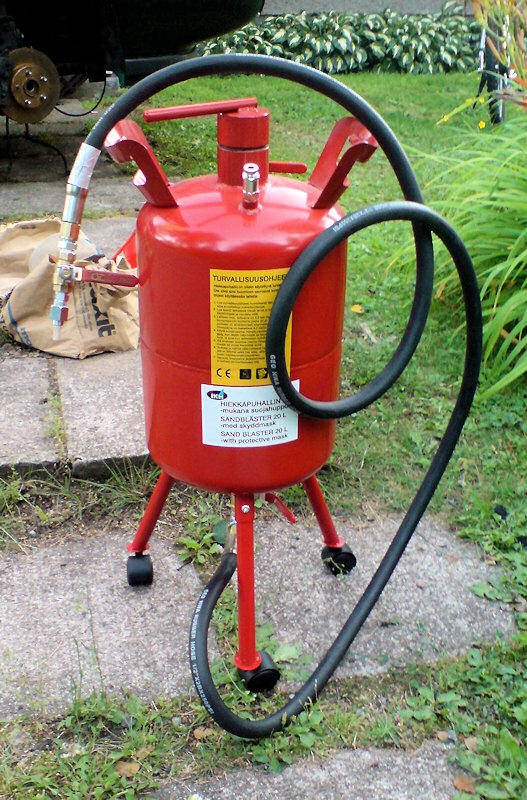
You Really want to consider buying a sandblaster unit, seriously, the only good way to handle that and make sure the rust wont come right back.
I got mine from cheapo store, something like 150 usd with the high taxes here.
Works just fine, but it has wear on the valve and nozzle after using about 10 sacks of sand.
I got mine from cheapo store, something like 150 usd with the high taxes here.
Works just fine, but it has wear on the valve and nozzle after using about 10 sacks of sand.
-
woody90gtz
- Registered User
- Posts: 4764
- Joined: Thu Jul 11, 2002 8:45 pm
- Location: Walton, NY
- Contact:
Re: DTMAce's project continues....5-26 - Floor Pan Disaster!
A sandblaster is a good idea for this kind of thing. Be careful with those floor pans though. Even though they are not through, it looks like there is quite a bit of metal missing due to the corrosion, making it much weaker. That structural foam idea is sounding better and better isn't it? wink
91 "SS" - WOT 3400/5spd - 13.29@101.6 - World's fastest N/A FWD Beretta
96 "T56" LS/6spd/8.8 RWD swap - 13.45@104.7 lol
GEARHEAD dezign youtube
96 "T56" LS/6spd/8.8 RWD swap - 13.45@104.7 lol
GEARHEAD dezign youtube
Re: DTMAce's project continues....5-26 - Floor Pan Disaster!
We have a blaster here. But not blasting it. There are going to be areas even the blaster won't reach. lol And I have exactly 3 weeks. Very little time left and lots to do. I hope to have this carpeted and mostly back together middle of next week.
Don't worry, I think its going to be fine. Most of this is because of the floor staying wet, due to the leaks. Once it stays dry, that will also inhibit the rust quite a bit. And I don't drive it in the winter, it gets parked, so not overly worried. As I said someplace before, fix it so its better, drive it till it dies, then replace if needed. lol
Don't worry, I think its going to be fine. Most of this is because of the floor staying wet, due to the leaks. Once it stays dry, that will also inhibit the rust quite a bit. And I don't drive it in the winter, it gets parked, so not overly worried. As I said someplace before, fix it so its better, drive it till it dies, then replace if needed. lol
94' Z26 Project - 95' Base Project - Custom LED Light Conversions!
Chosen Proposal Submission & Committee Member for Beretta Fest 2012 in Traverse City Michigan
Chosen Proposal Submission & Committee Member for Beretta Fest 2012 in Traverse City Michigan
Re: DTMAce's project continues....5-26 - Floor Pan Disaster!
Well picked up the rust treatment stuff today...
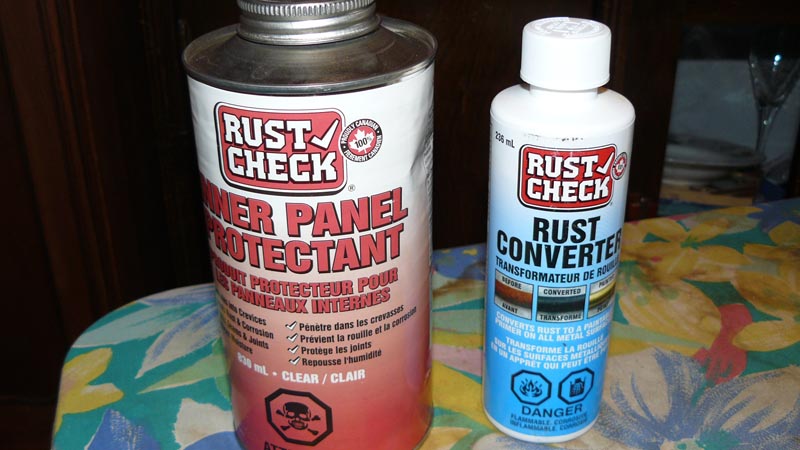
The small bottle is what I will be using mostly on the floor pan. Should only need the one bottle though. The other stuff I might use, depends. Was thinking of using it on the inner body panels, like between the inner wall and the rear quarter panels, etc. It is more of a preventer than something you use after the cow escaped the barn... lol
See how it does. Once its treated and cured/dried, I can paint right over it. I have several cans of rubber undercoating waiting to be used... lol
94' Z26 Project - 95' Base Project - Custom LED Light Conversions!
Chosen Proposal Submission & Committee Member for Beretta Fest 2012 in Traverse City Michigan
Chosen Proposal Submission & Committee Member for Beretta Fest 2012 in Traverse City Michigan
Re: DTMAce's project continues....5-26 - Floor Pan Disaster!
OK.
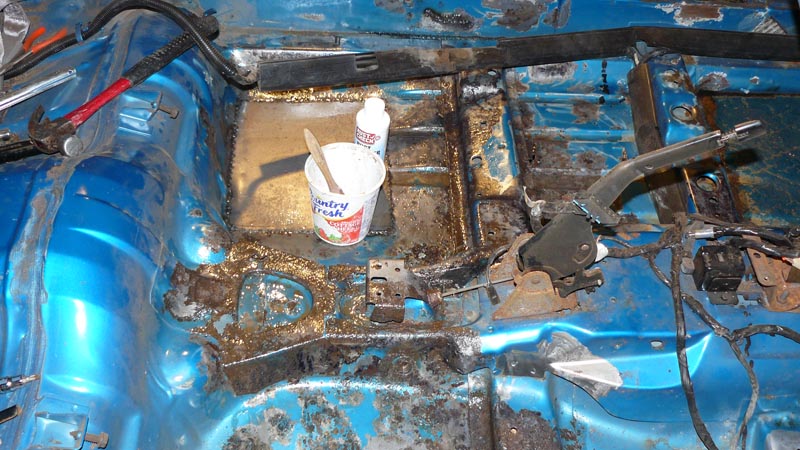
More updates!
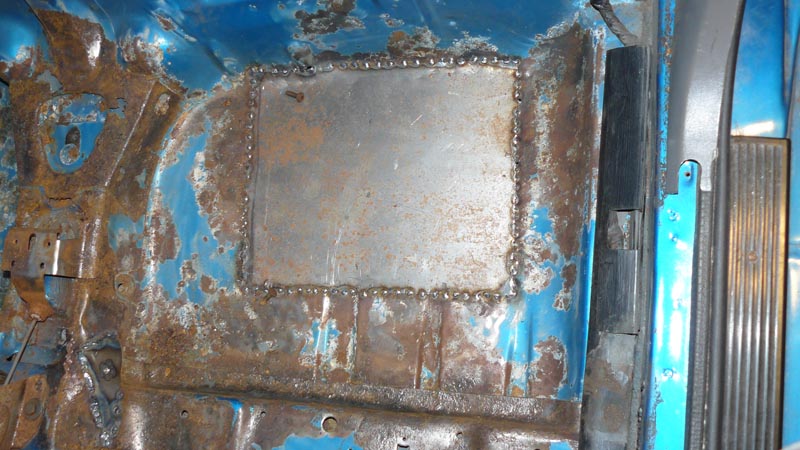
I have welded in some patches for the big hole, and for the seat rail support. I then went ahead and treated the entire floor with the rust converter. (Its basically phosphoric acid, mixed with some other stuff). You can see in the last two pics the difference it has. Once this dries, I will go through, clean the floor thoroughly, treat any other areas I missed. Next go through and seal up any pinholes and welded areas with car seam sealant, then black rubber undercoat the entire floor. (later I have to jack it up and work on the bottom side, just to double up on the protection).
Yes, there are a couple exterior shots, showing just how filthy this has gotten from sitting in the storage building during the work! UGH. Going to need a major bath!
Anyways, enjoy!

More updates!
I have welded in some patches for the big hole, and for the seat rail support. I then went ahead and treated the entire floor with the rust converter. (Its basically phosphoric acid, mixed with some other stuff). You can see in the last two pics the difference it has. Once this dries, I will go through, clean the floor thoroughly, treat any other areas I missed. Next go through and seal up any pinholes and welded areas with car seam sealant, then black rubber undercoat the entire floor. (later I have to jack it up and work on the bottom side, just to double up on the protection).
Yes, there are a couple exterior shots, showing just how filthy this has gotten from sitting in the storage building during the work! UGH. Going to need a major bath!
Anyways, enjoy!
94' Z26 Project - 95' Base Project - Custom LED Light Conversions!
Chosen Proposal Submission & Committee Member for Beretta Fest 2012 in Traverse City Michigan
Chosen Proposal Submission & Committee Member for Beretta Fest 2012 in Traverse City Michigan
Re: DTMAce's project continues....5-26 - Floor Pan Disaster!
Good progress, I feel your pain. Make certain you take the time to seal around all of your patch panels that are on the exterior 'shell' of the car (like the floor pan patch). Otherwise you will get water working its way into the floor pan area, make you carpet smell and rust through again. Don't use silicone. Stop by a auto paint supply or body supply store and get some real body seam sealer.
2011 Equinox LT (daily driver)
1981 Omega Sport (waiting to be restored)
Photobucket: http://s912.photobucket.com/albums/ac324/dhenderz/
1981 Omega Sport (waiting to be restored)
Photobucket: http://s912.photobucket.com/albums/ac324/dhenderz/
Re: DTMAce's project continues....5-26 - Floor Pan Disaster!
Already have the proper car body sealer. Already going to jack her up and work the bottom side some as well. Hopefully later this week. Will have some more new pics later today too. lol
94' Z26 Project - 95' Base Project - Custom LED Light Conversions!
Chosen Proposal Submission & Committee Member for Beretta Fest 2012 in Traverse City Michigan
Chosen Proposal Submission & Committee Member for Beretta Fest 2012 in Traverse City Michigan